
We don’t need NixOS cloud images? There’s an easy workaround? Your reaction to this may be: Yay! Tell me more - now! Or it may be more like this: Huh? Why do we need NixOS cloud images anyway?
Let’s deal with the second reaction first.
What are cloud images and why do we need them?
When you create a server in the cloud, the cloud provider lets you select from their available images to get the operating system you want. Most of them have a list of the most common operating systems, and you can choose. Google Cloud, for example, includes options like Debian, Centos, Ubuntu and Windows Server.
Very few providers include NixOS. For NixOS lovers, this is a monumental disaster.
The good news
Ok, now we’re all on the same page. Let me share the good news: we no longer need NixOS cloud images, because with a simple free tool, you can install NixOS painlessly anywhere you like! The tool is, appropriately, named nixos-anywhere, and you can use it directly from Numtide’s Github repo.
In this article, I’ll take a look at this tool, and share a worked example showing how I used it to install NixOS on Vultr.
Nixos-anywhere is the brainchild of Numtide members Jörg and Lassulus, with a bit of help from other collaborators.
To use it, all you have to do is:
- Create your server in the cloud with a standard Linux image, for example Ubuntu
- Set up an SSH connection
- Create your configurations for the new server on your local machine
- Issue a single CLI command on your local computer
- Sit back, relax with a cup of coffee, and everything gets done for you.

Even better news
That’s the good news. Now let me share the excellent news. With nixos-anywhere, you can preconfigure your new server, and create as many identical servers as you like in the cloud or anywhere else. If you need a mixture of local servers and servers on various different cloud providers - no problem. Just tweak the configurations a bit, then create each new server with a single CLI command.
And there’s no need to babysit your installations. Everything gets done automatically. If you get it right once, it will work in exactly the same way every time. Just like Nix, in fact.
So how does it work? First, nixos-anywhere connects to the remote machine via SSH. Next, it uses kexec to boot into a NixOS installer image. It then uses another tool, disko, to partition your disks, create and format file systems, and mount them. Then it uses the configurations you defined to build and install the NixOS system before rebooting. And that’s it. You now have a working NixOS system in the cloud.
Let’s look at how I used nixos-anywhere to install NixOS on Vultr, a popular cloud provider. This same process will also work with most other cloud providers. With a bit of tweaking, it works on most bare metal servers as well.
I’ll be working from my local machine, which runs Ubuntu and has Nix installed.
Installation Example
Step 1: Create the server.
I created a small cloud server on Vultr. Because nixos-anywhere needs to kexec into a NixOS image, the new server needs a minimum of 2 GB of RAM to be able to store the image. This is the server I chose for the test.
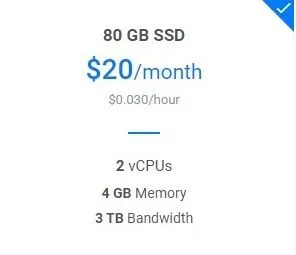
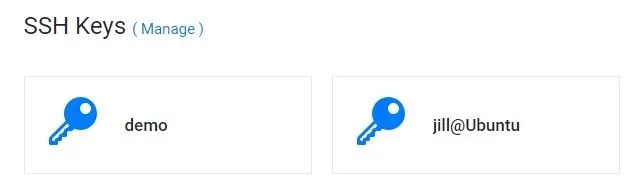
I picked the latest version of Ubuntu as my operating system. Any 64-bit Linux with kexec support would have worked just as well. I included my SSH key when creating the server. This is important, as nixos-anywhere needs to access the new server this way.
Step 2: Check the existing disk set-up
I logged into the new Vultr server, and had a look at what it had in the way of disks using lsblk.
root@jill:~# lsblk
NAME   MAJ:MIN RM   SIZE RO TYPE MOUNTPOINTS
loop0    7:0    0    73M  1 loop /snap/core22/607
loop1    7:1    0  73.8M  1 loop /snap/core22/750
loop2    7:2    0   163M  1 loop /snap/lxd/24643
loop3    7:3    0  53.3M  1 loop /snap/snapd/19457
loop4    7:4    0 170.1M  1 loop /snap/lxd/24918
loop5    7:5    0  53.3M  1 loop /snap/snapd/19361
sr0     11:0    1  1024M  0 rom
vda    252:0    0    80G  0 disk
└─vda1 252:1    0    80G  0 part /
Ok, so it has one disk named vda with a single partition.
Step 3: Configure disko
Since nixos-anywhere uses the disko tool to partition and format the disks, the next task is to configure disko. Luckily, disko has lots of sample configurations catering for most of the common disk partitioning and formatting options. For this exercise, I chose this one. You may like to take a moment to have a look at this file.
It’s nice and simple. It will create a standard GPT partition that works with both EFI and BIOS systems. The only thing that I need to check is that the name of the disk matches the disk name I noted in Step 2. The disk on Vultr is named /dev/vda, and yes, it does match, so I don’t need to change anything.
On my local machine, I created a directory called VultrTest and saved this file in there as disk-config.nix.
Step 4: Create a flake
In its simplest form, nixos-anywhere uses flakes. If you’re not familiar with flakes, this is a great time to try them out. I’d recommend reading the flake documentation. If you haven’t used flakes before, you’ll need to enable them. The document in the previous link tells you how to do this.
So in this step, in the directory VultrTest, I created a flake using nix flake init, and edited it to suit my requirements. You can see the edited flake here.
Explaining the syntax of the flake is beyond the scope of this article, but I’ll just mention a few points of interest.
- The output configuration is given a name in the following entry. This names the configuration as
vultr.
nixosConfigurations.vultr = nixpkgs.lib.nixosSystem- Under
modules, the following entry specifies that a configuration namedvconf.nixunder theconfigsdirectory should be included.
./configs/vconf.nixStep 5: Create NixOS configurations for the new server
In a new directory named configs under VultrTest, I created the file named vconf.nix, as referred to in the flake. In here, I put some configurations that will be applied to the new server when it’s built. I enabled flakes and added a few packages from nixpkgs. Most importantly, I included my SSH key so I can still log into the new server after the installation. You can include any NixOS configurations in this file. You can see my configurations here.
Step 6: Create flake.lock
Almost ready to go. The last thing that needed doing before I could do the installation was to create the flake.lock file. To do this, I ran the following Nix command in the VultrTest directory:
nix flake lockI now had everything I needed for the installation. At this point I copied VultrTest and its contents to Github for safekeeping.
Step 7: Do the installation
I could now run nixos-anywhere. From the VultrTest directory, I used the following Nix command to do the installation:
nix run github:numtide/nixos-anywhere -- --flake ./#vultr root@78.141.223.17Note that #vultr matches the name I gave to the configuration in Step 4.
The command ran for perhaps 15 minutes, displaying information about each step as it progressed. Finally, it terminated with no error messages, and the notation:
Done!And that’s it! NixOS had been successfully installed on the new server. To check this, I needed to remotely log in to it. Since the old operating system had been overridden, I first had to delete any entries for it in .ssh/known_hosts, because the keys would have changed. I then used SSH to log in to the new server to check that NixOS was running, and the packages I’d specified in vconf.nix had been installed.
Maintaining the configuration on the new server
It’s worth noting that nixos-anywhere doesn’t create a configuration.nix on the new server. This is because the configurations are held in the flake and any files that it references. If I needed to make changes to the configuration of this server later, I would make the necessary changes to the files I saved on GitHub, and reference this when running nixos-rebuild. My rebuild command would then be:
nixos-rebuild --flake github:JillThornhill/VultrTest#vultr switchStoring the configuration remotely makes it really easy to rebuild the server if it ever crashes. It also means it’s easy to create more identical servers. And lastly, storing it on GitHub gives you all the advantages of version control: you always know exactly what’s been changed if anything’s not working correctly.
Summary
In summary, nixos-anywhere provides a simple way to install NixOS where no cloud image is available. It also lets you create any number of identical servers, and get on with other important stuff (e.g. having a coffee break) while all the hard work is done for you. In fact, it’s a system administrator’s dream come true!